These videos show you how to perform pairing operations 2nd, 3rd and 4th generation hubs from alarm.com + building36.
Operations for 4th generation Alarm.com (part # ADC-NK-200T) dual-path hubs:

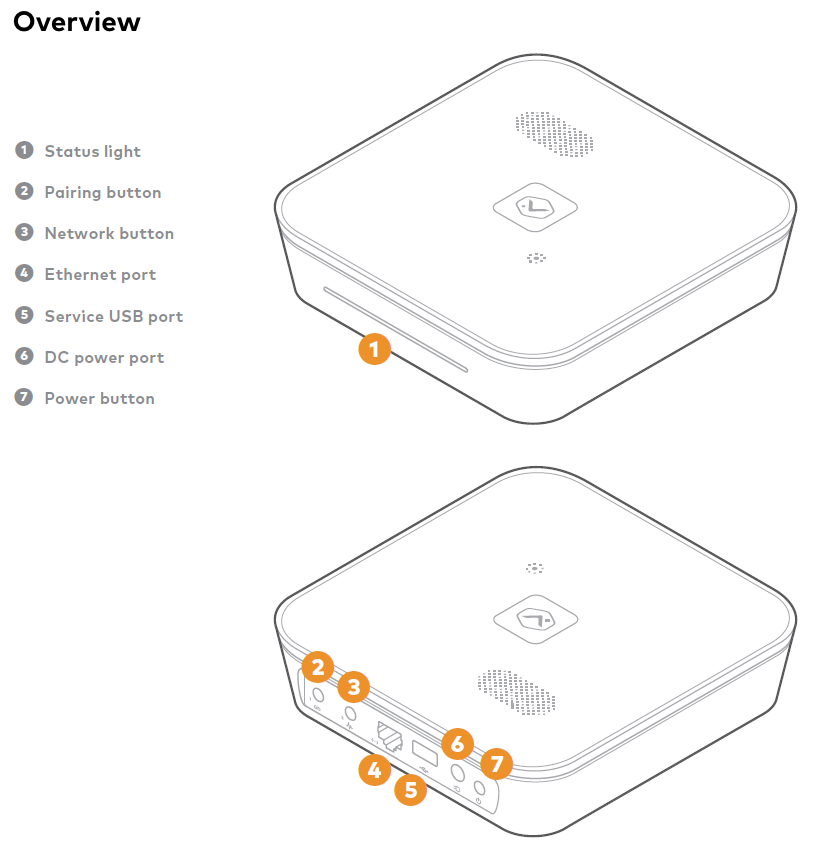 To add a Z-Wave device locally using the buttons on the Hub:
- Press the
 button to put the Hub into Add mode.
- The Hub beeps and the status light blinks green when in Add mode.
- Trigger the Z-Wave device to add it to the network. Refer to the device’s installation documentation.
- The Hub’s status light displays a green back and forth sweeping pattern when it is adding a device.
- The Hub beeps and the status light turns solid green after a device has been successfully added to the Z-Wave network.
- Repeat steps 1 and 2 to add additional devices to the network. After a period of time, the Hub will exit Add mode and the status light returns to solid white. If this happens, press the button again to return to Add mode (blinking green light).
To delete a Z-Wave device locally using the buttons on the Hub:
- Hold the button until the Hub's status light blinks red (approximately 3 seconds).
- The Hub beeps and the status light blinks red when in Delete mode.
- Trigger the Z-Wave device to delete it from the network. Refer to the device’s installation documentation.
- The Hub beeps and the status light turns solid red after a device has been successfully deleted from the network.
- Repeat steps 1 and 2 to delete additional devices to the network. After a period of time, the Hub will exit Delete mode and the status light returns to solid white. If this happens, press and hold the button again until the status light starts blinking red to return to Delete mode (approximately 3 seconds).
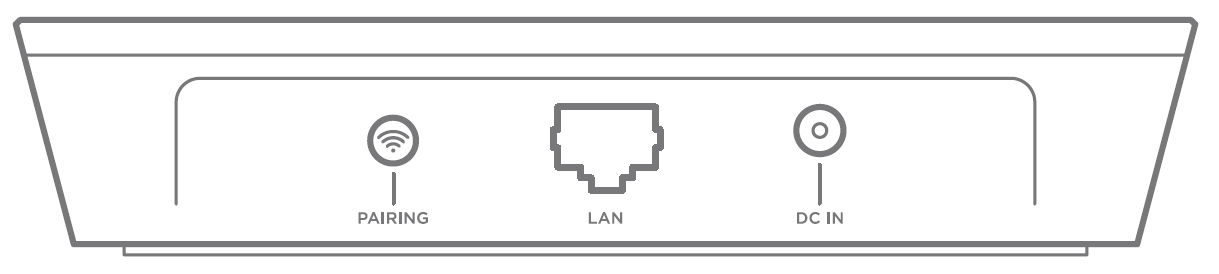
Operations for 3rd generation Building36 Cellular Hub (part # B36-N100-NA) and 2nd generation Building36 broadband hub (with serial # starting with FA3xxxxxxx):

Including Z-Wave Devices
To include Z-Wave devices, each device must be within direct communication range of the Hub. For best results, we recommend having the Hub in the same room as the device you are including.
- If necessary, unplug the Hub to move it into direct range of the first Z-Wave device. Provide the Hub with power and wait until only a white light stays solid or starts flashing. It is OK to disconnect the Ethernet cable during the inclusion/exclusion process.
- Add Z-Wave Devices
- Press the Pairing button () on the Hub once to put the Hub in Inclusion mode. The light will start flashing green.
- Follow the Z-Wave device’s instructions to put the device into Inclusion Mode. Most devices have an Include/Exclude button.
- Wait for the flashing green light to stay solid for five seconds to indicated the device has been successfully included.
Excluding Z-Wave Devices
To exclude Z-Wave devices, each device must be within direct communication range of the Hub. For best results, we recommend having Hub in the same room as the device you are excluding.
- Press and hold the Pairing button () for five seconds until the light flashes orange to put the Hub in Exclusion Mode. While you’re holding the Pairing button, the light will be flashing green before it turns orange.
- Follow the Z-Wave device’s instructions to put the device into Exclusion Mode. Most devices have an include/exclude button.
- The flashing orange light will turn solid to indicate the device has been successfully excluded.
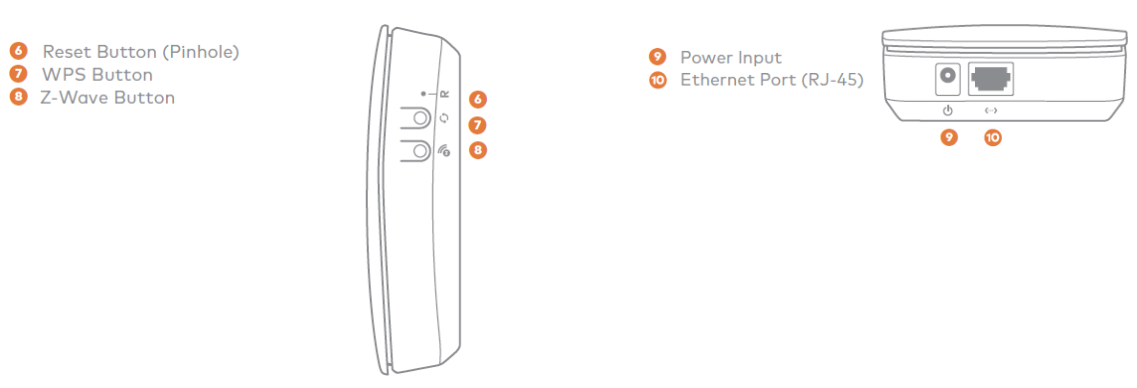
Operation for SG130Z hub:
To add Z-Wave devices locally using the buttons on the device:
- Press and release the
 button located on the side of the Smart Gateway to put it into Add mode. The Z-Wave LED will begin blinking slowly.
 - Trigger a device to add it to the network. The Z-Wave LED on the Smart Gateway will begin blinking quickly as the device is being added.
- When a device is added successfully, the Z-Wave LED on the smart gateway will remain solid for 15 seconds.
- Repeat this process to add additional Z-Wave devices.
To remove Z-Wave devices locally using the buttons on the device:
- Press and hold the button located on the side of the Smart Gateway for 3 seconds until the Z-Wave LED goes solid.
- Trigger a device to remove it from the network.
- When a device is removed successfully, the Z-Wave LED on the Smart Gateway will blink slowly for 15 seconds.
- Repeat this process to add additional Z-Wave devices.
Troubleshooting
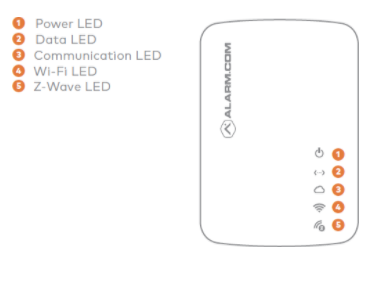
If you are experiencing issues using the Smart Gateway, please try the following troubleshooting options:
Check your router’s connection to the Internet
If you cannot access the Internet using your router, please contact your Internet Service Provider to restore Internet access. Try adding the device again.
Perform a communication test
Press the Reset button (pinhole) for 1 to 3 seconds (use a paper clip or tool if necessary). The Communication LED will quickly flash five times to indicate that the test was sent. Please wait two minutes before trying to use the device again.
Power cycle
Unplug the device from power for 10 seconds and plug it back in. Wait for the Power and Communication LEDs to become solid before trying to use the device again.
Partial reset
During a partial reset, all associated devices remain paired to the Smart Gateway and the communication settings are reset. Press and hold the Reset button for 15 to 20 seconds. All LEDs will blink simultaneously to indicate that the device will be partially reset.
Full factory reset
A factory reset will return the Smart Gateway to factory settings and reset the Z-Wave network. Press and hold the Reset button for 30 seconds. All LEDs will blink simultaneously and then turn solid.

Note: If you are adding a new class of product to your system, please contact ePropertyCare at [email protected] to make sure the integration is enabled in your account.